| Author |
 Topic Topic  |
|
arrocuda
United Kingdom
501 Posts |
 Posted - 11 Mar 2020 : 19:16:25 Posted - 11 Mar 2020 : 19:16:25


|
Don't see any reason as to why not cos everything else in the way of suspension appears to be interchangeable. It was about 5 - 6 years ago I guess since I bought mine, so was surprised to see they had gone up that much.
Tim |
Edited by - arrocuda on 11 Mar 2020 19:21:55 |
 |
|
|
Sunbeam-mike
United Kingdom
174 Posts |
|
|
arrocuda
United Kingdom
501 Posts |
 Posted - 10 Mar 2020 : 09:05:12 Posted - 10 Mar 2020 : 09:05:12


|
TBH I can't remember as to where I bought them now Mike. It was several years ago maybe a couple of years before I took the car for it's first MOT. They cost me about £120 the pair and although the original ones weren't leaking, they were heavily corroded, so it was a no brainer really.
The first time I drove it I realised I'd set them up way too stiff, it was almost as if the car was riding on the rear axle with no suspension at all. So I softened them every time I took it out by 1/2 a turn at a time till I found the ideal compromise.
Hunter ones should fit AFAIA if they are the only ones you can get your hands on as the Rapier is almost a forgotten car as far as aftermarket support goes these days. The only possible exception being Speedyspares maybe.
Tim |
 |
|
|
Sunbeam-mike
United Kingdom
174 Posts |
 Posted - 10 Mar 2020 : 08:21:03 Posted - 10 Mar 2020 : 08:21:03


|
Hi Tim,
Thanks for the feedback.
Maybe you're right. Adjustable rear shocks have been on my list for a while: Never seem to have the time! My rear passenger once complained it was like being in a boat!
Last time I looked I found some for a Hunter.
Have you a part number/supplier you could recommend?
Mike
Mike Hooper |
 |
|
|
arrocuda
United Kingdom
501 Posts |
 Posted - 09 Mar 2020 : 09:20:08 Posted - 09 Mar 2020 : 09:20:08


|
Mike..... only problem I could see with this idea is that polyurethane is a hard substance that has no flex at all in it. Ideal for bushes in control arms and such where there is no requirement for the bearing to flex. With a prop shaft the angle of the shaft relative to the floor of the car to which the bearing is mounted is constantly variable by a small amount of degrees, depending upon just how high the car is sitting on its suspension at the time of measurement.
The reason you are getting the 'knock' on acceleration is most likely down to the shift in weight distribution from the front to the rear which is common in rear wheel drive cars, particularly older ones that have less sophisticated suspension systems such as ours do. This is why you have the splined shaft coupling on the gearbox end, as the more parallel the shaft becomes with the floor of the car the further forward the coupling needs to move so as to accommodate the extra length in the shaft. I fitted Spax adjustable shocks on my car's rear end and set them up for a stiff ride which probably explains why I'm not getting the knock when I hoof it.
If you have them try adjusting them so as to stiffen the rear end suspension which should have the effect of minimising prop' shaft float and see if it improves the situation. If you don't have them consider buying some as they do improve the overall handling of the car significantly for relatively little money.
Tim |
Edited by - arrocuda on 09 Mar 2020 09:21:20 |
 |
|
|
Sunbeam-mike
United Kingdom
174 Posts |
 Posted - 10 Jan 2020 : 08:56:17 Posted - 10 Jan 2020 : 08:56:17


|
Hi,
A quick long term report: The support is still there, the only problem so far is a slight thump if I take off too quickly. It's only to be expected I suppose, the amount of rubber in the replacement is a lot less than the original.
With a view to repairing the original, I thought I'd pass on this link describing fabrication of a suspension bush from scratch using liquid polyurethane:
https://www.facebook.com/groups/608845186127310/permalink/1057882231223601/
I haven't tried to use the stuff, as I said the replacement is still working. If the polyurethane can bond to the metal parts sufficiently maybe this is the answer.
Anyone used this?
Mike Hooper |
 |
|
|
bigt80
United Kingdom
1052 Posts |
 Posted - 08 Feb 2019 : 10:07:17 Posted - 08 Feb 2019 : 10:07:17


|
Great thred here chaps: not read in full detail, but looks to be an excellent solution to the split prop brg issue. Club got half-a dozen from Cyprus many years ago, but all got sold. They were oe with part no. sticker on & subsequenly on e-Bay I did see guy from Cyprus selling them as well, but guess they all went. They appeared to be OK, but not sure how long they lasted. Anyway, if this proves to be an alternative - even if it involves some modification - it will help others; all goood stuff  . Cheers. G . Cheers. G |
 |
|
|
arrocuda
United Kingdom
501 Posts |
 Posted - 26 Jan 2019 : 18:48:34 Posted - 26 Jan 2019 : 18:48:34


|
Hi Mike..... only just picked this up from the link to the thread you reposted. I too was a little concerned because I couldnt centre the bearing any better than you did. The bar is really tough stuff to bend into shape.
Test drove it shortly after I completed the job and took it up to around 60 mph with no apparent humming or vibration. Have you test driven yours yet?
By the way, your garage/workshop puts mine to shame. Is the last time I put up any more pics on here.  |
 |
|
|
Sunbeam-mike
United Kingdom
174 Posts |
 Posted - 09 Jul 2018 : 18:31:45 Posted - 09 Jul 2018 : 18:31:45


|
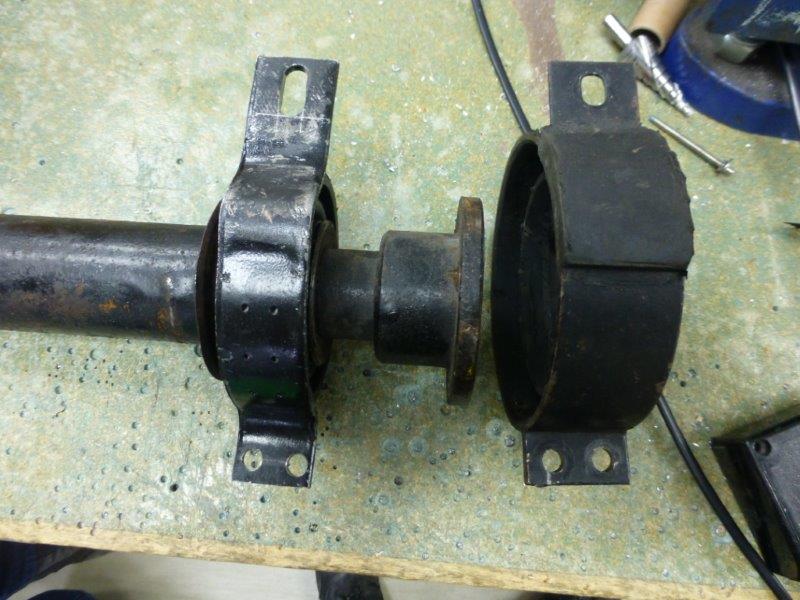
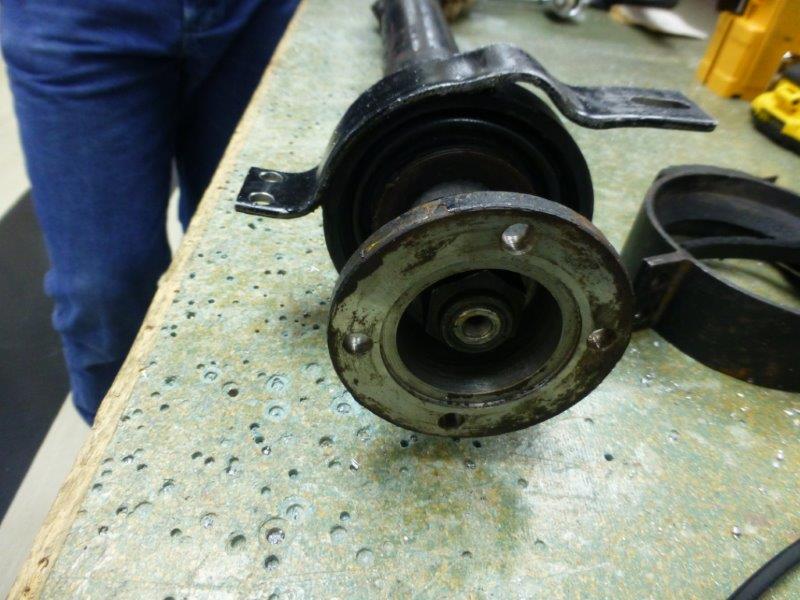
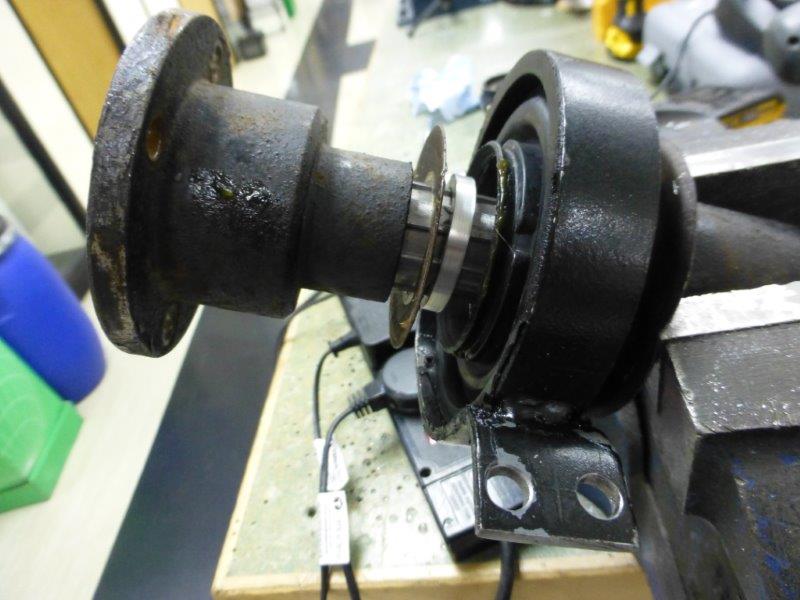
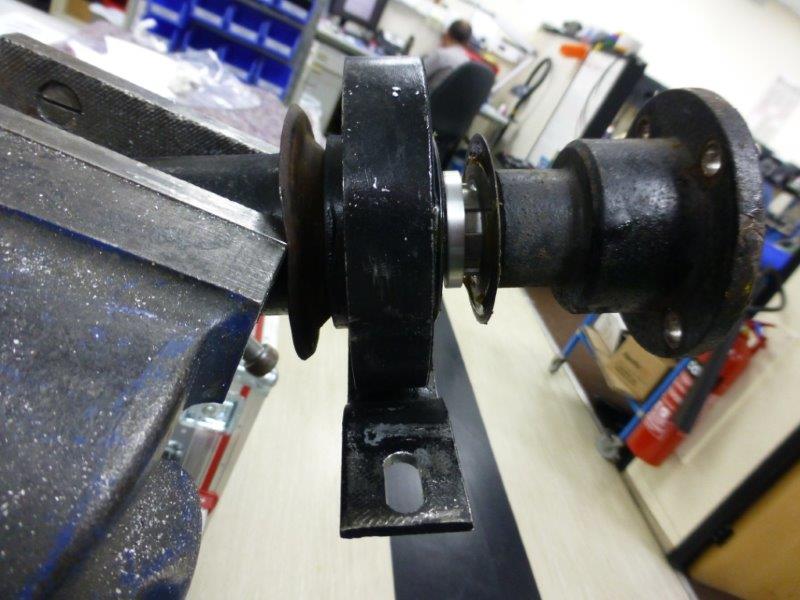
Finally beat the new prop support into approx. the right shape and assembled on to the prop.
I thought you may like some pictures.

I noticed the new bearing is slightly eccentric in its mounting.

I don't think it'll matter.

The 'home bent' brackets probably don't help either.

I turned up some 5mm spacers to fill the space left by the new bearing.
Arrocuder - how did the fitting go?
Mike
Mike Hooper |
 |
|
|
arrocuda
United Kingdom
501 Posts |
 Posted - 25 May 2018 : 21:36:25 Posted - 25 May 2018 : 21:36:25


|
TBH there's very little in it as although the bar is a touch shorter, the hole is nearer the end, so maybe 1 - 2mm difference, but can always take a little more out if needs be. There is also a fair amount of float in the bearing, which should provide enough wriggle room for the holes to line up.
Have dropped the prop off and cut the old bearing down to just leave the race and then sliced it into 3 pieces with the cutting disc. The aim is to have 2 sleeves both 5mm in width to fill the gap either side of the new bearing. I cut them both deliberately slightly oversized, so I'm hoping to grind the excess off on Sunday morning.
I notice that they have sold out since I put the link up. When I bought mine there were four left and now they've gone. Bearing in mind, (every pun intended),  that that is probably not far short of the number of Quattros left on the road these days, the guy must be scratching his head big time right now. that that is probably not far short of the number of Quattros left on the road these days, the guy must be scratching his head big time right now. 
Tim |
Edited by - arrocuda on 25 May 2018 21:59:28 |
 |
|
|
Sunbeam-mike
United Kingdom
174 Posts |
 Posted - 25 May 2018 : 10:26:10 Posted - 25 May 2018 : 10:26:10


|
Item ordered.
Thanks for this.
The part you've scored & welded: looks a little short now. It'll be interesting to see if you have enough slot to fit as it is, or after some more surgery.
Mike Hooper |
 |
|
|
arrocuda
United Kingdom
501 Posts |
 Posted - 22 May 2018 : 10:44:47 Posted - 22 May 2018 : 10:44:47


|
It's intended for an Audi Quattro so should be sufficient for our purposes. You can get one here....
https://www.ebay.co.uk/itm/PROPSHAFT-CENTRE-SUPPORT-BEARING-AUDI-QUATTRO-4x4-30x15mm-176mm-66mm/131361534994?ssPageName=STRK%3AMEBIDX%3AIT&_trksid=p2057872.m2749.l2649
The only thing is that the bearing set width is 15mm, whereas on ours it is 25mm, but you can't get a 25mm without increasing the race diameter to 40mm. The shaft on the rapier is 30mm so is no way around it but my plan is to cut the race out of the old bearing set into 2 x 5mm wide sleeves, so as to cover the shaft on either side.
You need to align the shorter 'leg' of the new bearing with the shorter leg of the old one like so.

I then straightened the longer leg just by squeezing it between the jaws of the vice. From there you can bend the longer one around the case like so.

It's tough stuff to bend cos you can't use the bearing case itself as a pressure point. I ended up using some old stainless bar with a very sharp U in it as a jig, but you may have to improvise.
Once you've got it here you will find that it just almost lines up.

From here I just used the angle grinder to cut a slot about 1.5mm deep using a 1mm thick disk and pulled it back into alignment with the original.

After that I carefully welded the cut a little at a time so as not to overheat the metal and damage the rubber and drilled a couple of holes in the short leg to match the original mounting point on the other side. Just needs a little black paint over the shiny bits and it's ready to go on. Next job is to drop the prop and take the old one off.
Tim
|
Edited by - arrocuda on 22 May 2018 11:03:45 |
 |
|
|
Sunbeam-mike
United Kingdom
174 Posts |
 Posted - 20 May 2018 : 14:44:10 Posted - 20 May 2018 : 14:44:10


|
That looks promising.
It looks like you may just have to 're-arrange' the mountings.
How does the rubber compare: Is it as least as thick as the original?
What vehicle is it supposed to fit?
Mike Hooper |
 |
|
|
arrocuda
United Kingdom
501 Posts |
 Posted - 20 May 2018 : 13:04:49 Posted - 20 May 2018 : 13:04:49


|
Bearing arrived and although it wasn't the width I had in mind I'm fairly certain it will do the job.

Here it is side by side with a 'spare' one I had that turned out to be almost as knackered as the one I need to replace.
I'll be back with more pics of the job as it progresses.
Tim |
Edited by - arrocuda on 20 May 2018 13:09:04 |
 |
|
|
arrocuda
United Kingdom
501 Posts |
 Posted - 16 May 2018 : 16:05:27 Posted - 16 May 2018 : 16:05:27


|
Car is back up in the air now awaiting the arrival of the bearing. I've formulated a plan for the replacement which is mainly all about modding the mounting arrangement but will put some pics up as a guide for anyone facing the same problem.
Should have it tomorrow all being well.
Tim
|
Edited by - arrocuda on 16 May 2018 16:05:42 |
 |
|
 Topic Topic  |
|

